Hair shedding, slow growth, and scalp discomfort often trace back to irritation, buildup, breakage, or inconsistent care, not a single missing product. This guide focuses on Oils for Hair Growth that support scalp condition and reduce avoidable damage through correct selection and use. In applied use cases, the best outcomes come from controlled dilution, consistent scalp contact time, and a routine that matches hair type and washing frequency.
1 Best Essential Oils for Hair Growth
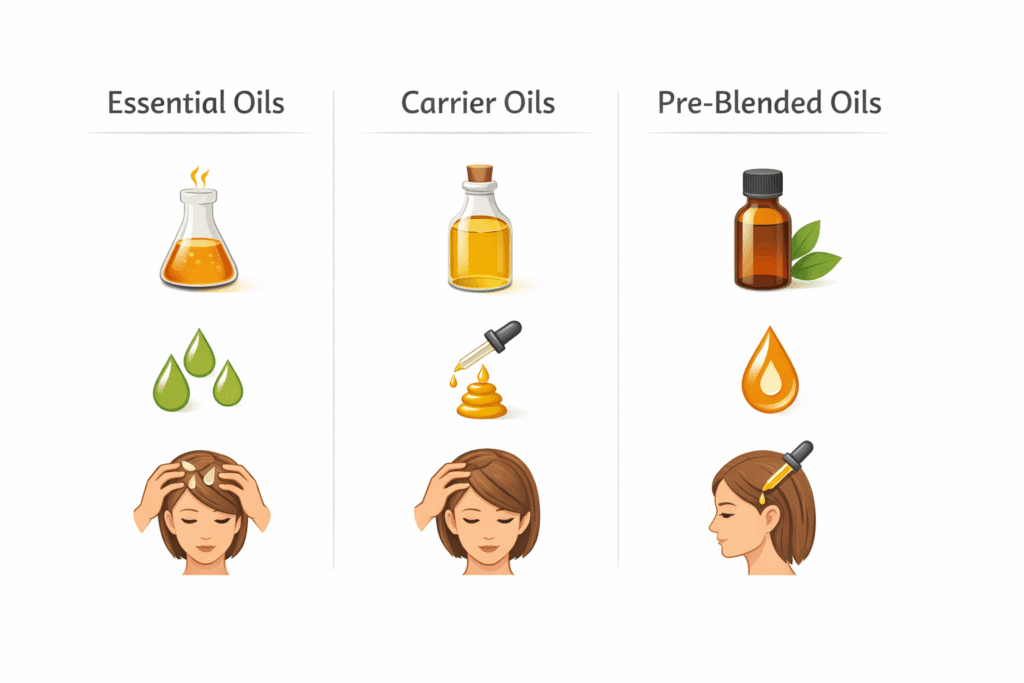
1.1 What Essential Oils Are and How They Differ From Carrier Oils
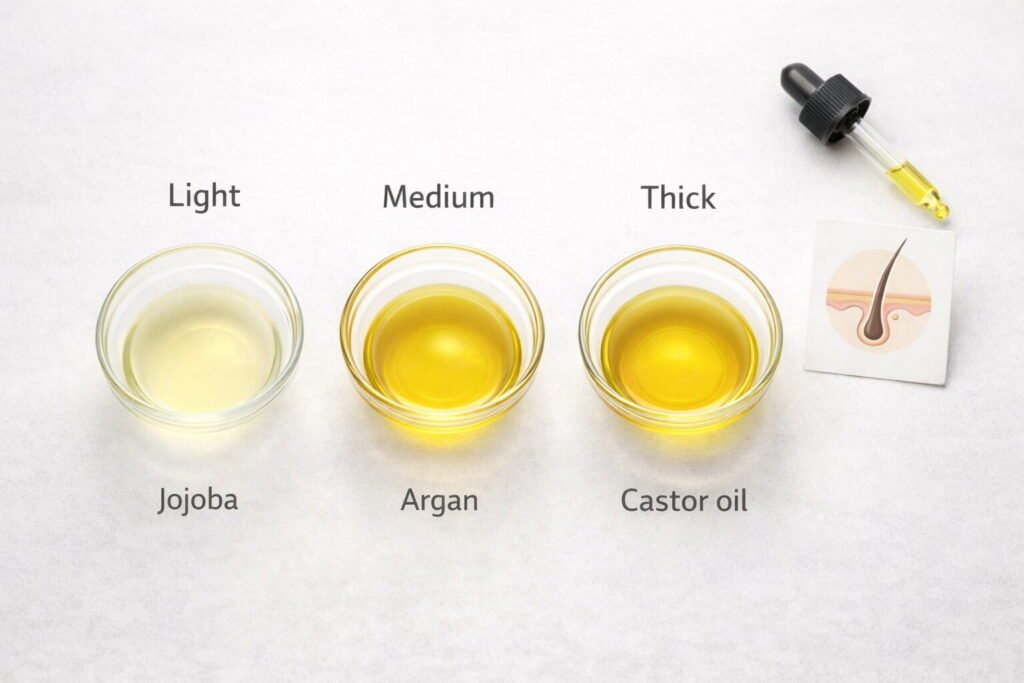
Essential oils are concentrated aromatic compounds extracted from plants, and they act as potent topical ingredients rather than stand-alone hair oils. They evaporate quickly and can irritate skin when used undiluted, which makes proper mixing non-negotiable for scalp use. Carrier oils are fatty oils such as jojoba, coconut, or argan that dilute essential oils and help spread them evenly across the scalp and hair. Carrier oils also reduce friction on hair strands, which can lower breakage that limits length retention.
A practical way to separate roles is to treat essential oils as the “active” component and carrier oils as the delivery base. Essential oils mainly target scalp factors like excess oil, microbial imbalance, or irritation, while carrier oils support barrier comfort and slip. Many people confuse shine or softness with growth, so separate appearance benefits from outcomes like reduced shedding or improved scalp tolerance. Use this rule to stay consistent: choose one carrier oil that suits scalp type, then add one or two essential oils at a measured dilution.
Comparison Table: Essential Oils vs Carrier Oils for Hair
| Option/Type | Best for | When to use | How to use | Pros | Cons | Risks/constraints | Verification cues |
|---|---|---|---|---|---|---|---|
| Essential oils | Scalp support routines | When targeting scalp comfort, flaking, oiliness | Dilute into a carrier before scalp application | Strong aroma, small amounts needed | Not moisturizing by itself | Irritation risk if undiluted; avoid eyes and broken skin | Botanical name on label, dark glass bottle, batch/lot info |
| Carrier oils | Slip, softness, barrier comfort | When hair feels dry, fragile, or prone to breakage | Apply to lengths or use as dilution base | Improves manageability, reduces friction | Can feel heavy | Buildup if overused; may worsen acne-prone hairline | Clear ingredient list, minimal additives, stable smell |
| Oil blends | Convenient routines | When you want pre-mixed use | Use only if dilution % is stated | Saves time, consistent mix | Hard to adjust | Unknown dilution can increase reactions | Listed dilution %, full INCI/ingredients, expiration date |
Decision rule: If a product does not state dilution or ingredient transparency, treat it as unsuitable for regular scalp use and move to selection criteria next.
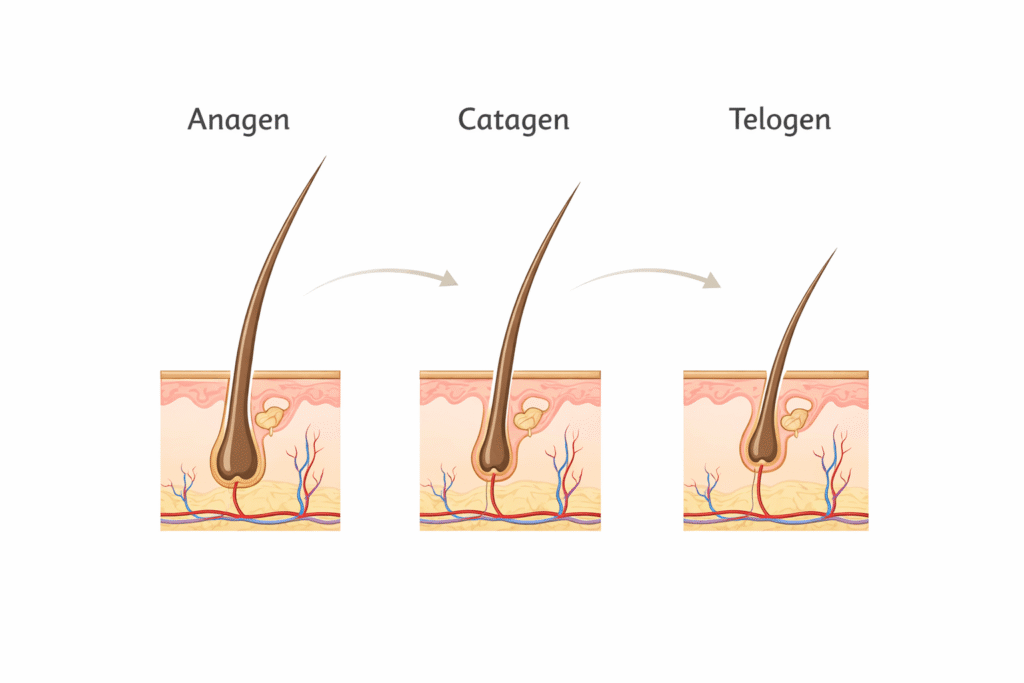
1.2 Hair Growth Cycle and Where Oils May Support Scalp Health
Hair grows in cycles that include an active growth phase, a transition phase, and a resting/shedding phase. Oils do not “force” follicles to produce new hair on demand, but they can support conditions that help hair stay on the scalp longer and break less during daily wear. A healthier scalp environment can improve comfort, reduce scratching, and lower inflammation triggers that can worsen shedding patterns. When evidence is mixed, treat oils as supportive care rather than a substitute for medical evaluation of persistent thinning.
The most useful outcome to target with oils for hair growth is often length retention, which depends on minimizing breakage and maintaining scalp tolerance. Scalp irritation, aggressive scrubbing, and heavy buildup can shorten the time you can keep a routine consistent. Oils may also help maintain a smoother cuticle on the lengths when used properly, which reduces tangling and mechanical damage. Keep expectations realistic: the visible difference usually comes from better strand survival and calmer scalp habits rather than dramatic follicle changes.
Decision rule: Focus on scalp comfort and breakage control first, because these factors most reliably change how much hair you keep over time.
1.3 Criteria for Selecting Oils for Hair Growth
Choose essential oils based on scalp needs, not trend lists, because mismatched oils often cause irritation or greasy buildup. For oily scalp, prioritize oils commonly used for sebum balance and freshness, while for dry or reactive scalp, prioritize gentle options and lower dilution. For hair lengths, select a carrier oil that matches texture and porosity, since heavy oils can weigh down fine hair and increase residue. Evidence is limited on “one best oil,” so prioritize tolerance, consistency, and measurable routine adherence.
Use a simple selection checklist to avoid impulse buying and reduce reactions. Look for clear labeling, botanical names, and packaging that limits oxidation, since degraded oils can smell sharp and increase sensitivity. Avoid complex blends at first, because it becomes harder to identify what caused itching or redness. Keep one change at a time so your scalp feedback stays reliable.
Checklist: Selection Criteria for Oils for Hair
- Label clarity: Botanical name, plant part, and country of origin if provided
- Packaging: Dark glass bottle with a tight cap to reduce oxidation
- Purity cues: Single-ingredient carrier oils; essential oils without added fragrance blends
- Scalp match: Lower dilution for sensitive scalp; avoid “hot” oils if reactive
- Routine fit: Choose oils you can apply consistently within your wash schedule
- Stop signals: Burning, persistent itching, redness, swelling, or dandruff worsening
Decision rule: Select one essential oil and one carrier oil that match scalp type, then apply only after passing a patch test and sticking to measured dilution.
2 Top Essential Oils for Hair Growth
2.1 Rosemary Oil
Rosemary oil is widely used in scalp routines because it supports a cleaner-feeling scalp and may help reduce discomfort linked to oiliness and irritation. Evidence is mixed, so results often reflect consistent application and better scalp habits rather than a guaranteed follicle response. Mix it into a carrier oil at a measured dilution and apply to the scalp in thin sections so coverage stays even. Avoid using it on broken skin or immediately after aggressive exfoliation, since stinging signals poor tolerance. Quick check: if tingling lasts beyond a few minutes or redness persists, lower dilution or stop.
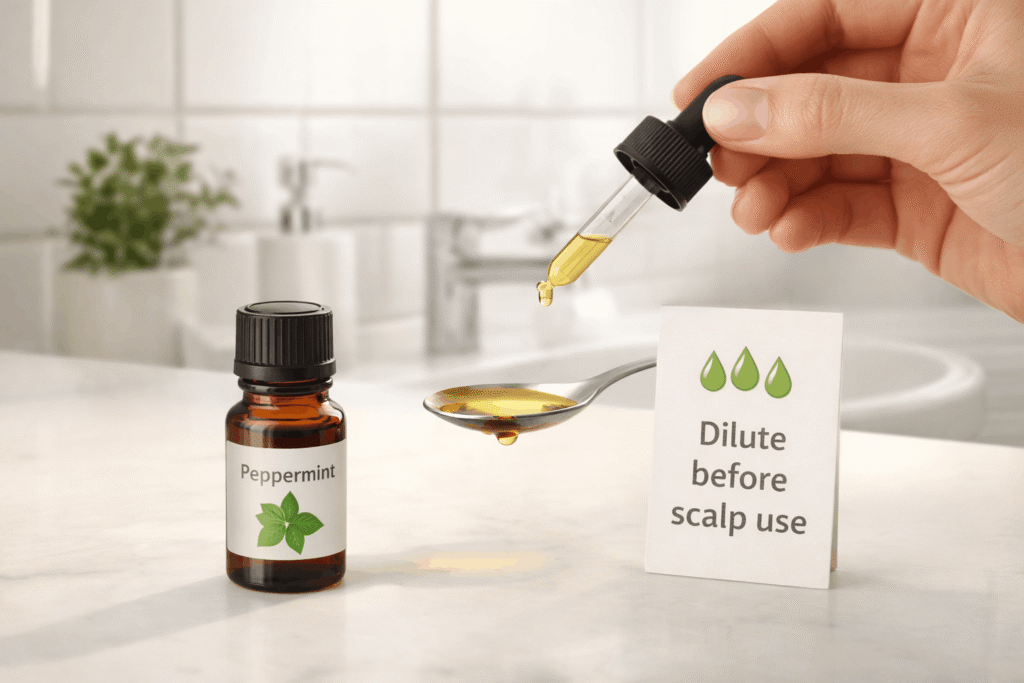
2.2 Peppermint Oil
Peppermint oil creates a cooling sensation that many people associate with freshness, but that feeling does not equal hair growth. It can support scalp comfort for some users, yet sensitivity is common, so evidence of benefit is limited by tolerance and correct dosing. Use a low dilution in a lightweight carrier oil and keep it away from the hairline and eyes to reduce irritation risk. Skip it if you already react to mentholated products or you develop dryness that worsens flaking. Quick check: if watering eyes, burning, or “cold burn” discomfort appears, wash off and discontinue.
2.3 Lavender Oil
Lavender oil is often chosen for scalp soothing and a calmer sensory experience during massage. It may help reduce itch-driven scratching, which can indirectly support length retention by preventing mechanical damage. Blend it into a carrier oil and focus application on areas that feel tight, dry, or reactive rather than saturating the entire scalp. Avoid pairing it with multiple strong essential oils at the start, because the combined scent load can increase irritation risk. Quick check: if the scalp feels calmer within 24 hours without extra greasiness, it is a good candidate for your baseline blend.
2.4 Cedarwood Oil
Cedarwood oil is commonly used in routines aimed at balancing the look and feel of the scalp, especially when hair becomes greasy quickly. Its main practical value is supporting a scalp environment that stays comfortable between wash days, which helps people keep routines consistent. Apply only after dilution and keep usage modest, since over-application can leave residue that attracts buildup. Do not treat heavy oiliness as a signal to use more oil; instead, adjust application zones and cleansing frequency. Quick check: if roots look heavier the next day, reduce amount or switch to a lighter carrier oil.
2.5 Thyme Oil
Thyme oil is a stronger essential oil that some people use for scalp freshness, but it can irritate easily when dilution is too high. Evidence is limited, and the main constraint is skin reactivity, so it suits experienced users who already tolerate essential oils well. Keep dilution conservative and apply only to the scalp, not the lengths, because it can increase dryness on hair fibers. Avoid combining it with other stimulating oils on the same day, since stacking irritants raises reaction odds. Quick check: if warmth escalates to burning, stop immediately and rinse thoroughly.
2.6 Clary Sage Oil
Clary sage oil is often selected for scalp routines where stress-related habits, such as frequent touching or over-washing, contribute to dryness and irritation. Its practical role is supporting a balanced-feeling scalp so the routine stays easier to maintain over weeks. Dilute it into a carrier oil that matches your scalp type, then massage lightly without scratching so you do not trigger redness. Avoid using it right before heat styling if your scalp is sensitive, because warmth can amplify irritation. Quick check: if scalp tightness eases without increasing flakes, it is a stable option for ongoing use.
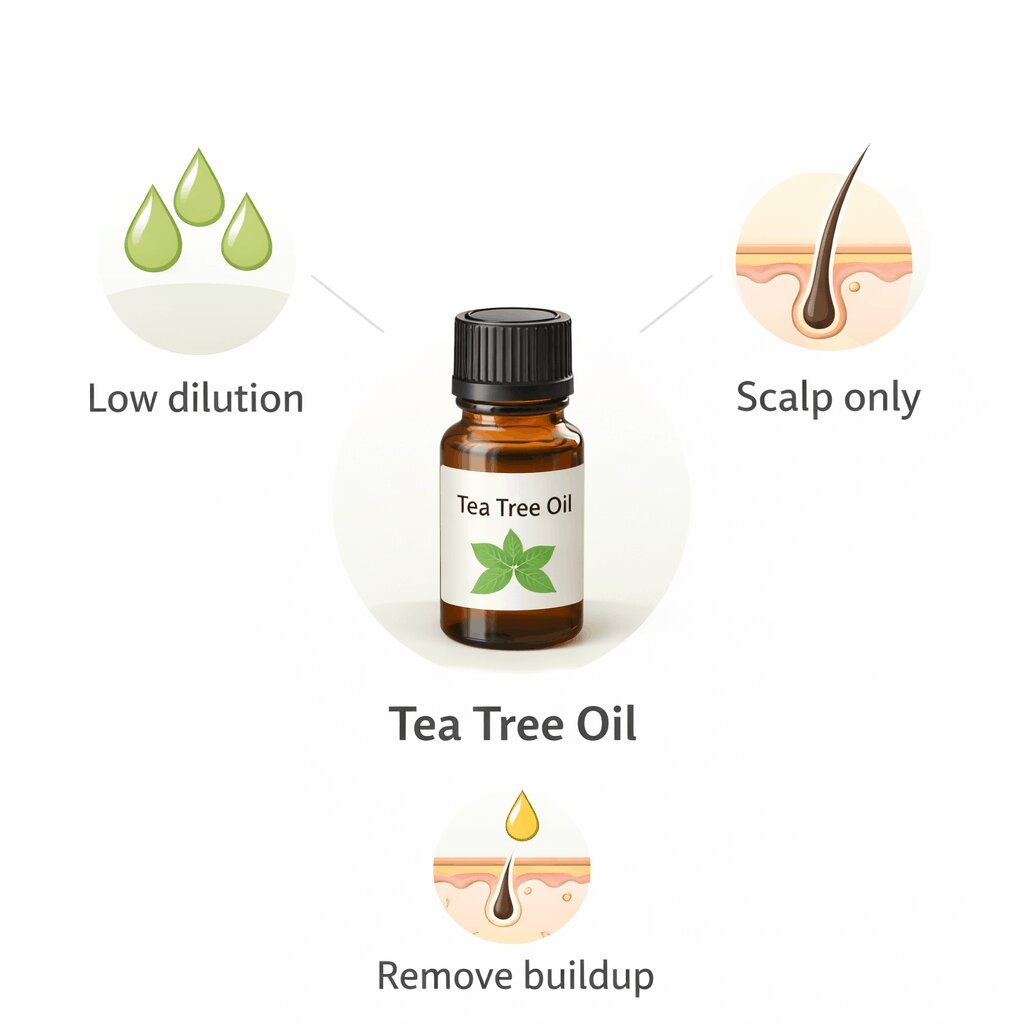
2.7 Tea Tree Oil
Tea tree oil is commonly used for flake-prone scalps and buildup-related itch, particularly when dandruff-like symptoms appear. It can be effective for some people, but evidence is mixed, and incorrect use often causes dryness or irritation. Use low dilution, apply to the scalp only, and pair it with a wash routine that fully removes oil films so the scalp stays clear. Avoid leaving thick oil layers overnight if flakes worsen, since trapped residue can make scaling more noticeable. Quick check: if itching reduces while the scalp stays comfortable, keep the same dilution and avoid adding extra actives.
2.8 Lemongrass Oil
Lemongrass oil is often chosen for a cleaner scalp feel and can fit routines where oiliness and odor concerns show up quickly. It tends to be more stimulating, so users with reactive scalps should treat it cautiously and accept that evidence is limited for growth-specific outcomes. Dilute it well, apply sparingly, and avoid daily use until you confirm tolerance. Do not use it after sun exposure or heavy sweating if your scalp is already irritated, since that can intensify sting. Quick check: if scalp feels fresh without prickling or redness, it can be used once or twice weekly.
2.9 Geranium Oil
Geranium oil is used in scalp blends aimed at comfort and balance, especially when the scalp shifts between dryness and oiliness. It can support a routine that feels pleasant enough to repeat, which matters because consistency drives most visible improvements in oils for hair growth routines. Apply diluted oil to the scalp, then use only a small amount on mid-lengths if you need slip, not shine. Avoid layering it over heavy styling products, since trapped residue can dull hair and irritate the scalp. Quick check: if hair feels softer but roots stay light, the carrier oil choice is working.
2.10 Ylang-Ylang Oil
Ylang-ylang oil is typically used to support dry scalp comfort and reduce the urge to scratch, which helps protect fragile new growth. Its scent is strong, so people prone to headaches or fragrance sensitivity should start with very low dilution and minimal contact time. Blend it into a gentle carrier oil, apply to the scalp in small sections, and keep it off the face and hairline to reduce irritation risk. Avoid using it in enclosed spaces if scent sensitivity is an issue, since discomfort leads to inconsistent use. Quick check: if the scalp feels less dry within a few applications and no sensitivity appears, keep it as a low-dose add-on rather than a dominant ingredient.
Decision rule: Choose one essential oil that matches your scalp concern, confirm tolerance for two weeks at a conservative dilution, then consider adding a second oil only if results plateau without irritation.
3 Carrier Oils That Pair Well With Essential Oils for Hair
3.1 Jojoba Oil
Jojoba oil is a lightweight option that suits many scalp types because it spreads easily and rarely leaves a heavy film. It works well when the goal is even essential-oil dilution without weighing down fine hair. Apply a small amount to the scalp in sections, then massage with fingertip pads to avoid friction. If hair looks limp the next day, reduce volume rather than changing oils immediately. Decision rule: choose jojoba when you need a low-residue base for scalp-focused blends.
3.2 Coconut Oil
Coconut oil can reduce friction on hair lengths and help limit breakage, which supports length retention over time. It tends to feel heavier and can build up, so it suits dry hair more than oily scalps. Use it mainly on mid-lengths and ends, and keep scalp use minimal unless your scalp tolerates richer oils well. If you notice itch or more flakes after use, cleanse sooner and reduce frequency. Decision rule: use coconut oil for dry, fragile lengths, not as a default scalp base.
3.3 Argan Oil
Argan oil is commonly used for smoothness and manageability, especially on frizz-prone hair. It pairs well with essential oils when you want a lighter finish on lengths while still diluting actives for scalp use in small amounts. Apply a few drops to damp mid-lengths, then use a separate diluted blend for the scalp to avoid over-oiling. Watch for silicone-heavy styling routines that can trap residue and change how argan feels on the hair. Decision rule: pick argan when you want slip without heaviness on the lengths.
3.4 Castor Oil
Castor oil is thick and sticky, which makes it better for targeted use than full-scalp saturation. People often choose it for the perception of thickness, but visible results usually come from reduced breakage and protective styling habits rather than follicle changes. If you use it, dilute it further with a lighter oil so it spreads evenly and rinses cleanly. Avoid frequent use if buildup causes itching or if washing becomes difficult. Decision rule: use castor oil only when you can wash thoroughly and keep application precise.
3.5 Grapeseed Oil
Grapeseed oil is a light carrier that can suit oily scalps because it absorbs faster and feels less greasy. It helps distribute essential oils without leaving the hairline slick, which improves routine consistency. Apply sparingly and focus on the scalp rather than coating the lengths, especially if hair gets oily quickly. Store it well, because lighter oils can oxidize and develop an off smell that increases irritation risk. Decision rule: choose grapeseed when you need a fast-feel carrier for frequent scalp use.
3.6 Sweet Almond Oil
Sweet almond oil offers a medium weight that supports softness on hair lengths while still working as a dilution base. It suits normal-to-dry hair that tangles easily, where added slip reduces mechanical damage during detangling. Use it on mid-lengths before brushing and reserve a measured diluted blend for scalp contact. Avoid heavy application if your scalp is acne-prone around the hairline. Decision rule: use sweet almond oil when your priority is detangling and softness with moderate residue.
3.7 Olive Oil
Olive oil is richer and can help with dryness and cuticle feel on thick or coarse hair types. It can be too heavy for fine hair and may contribute to buildup if used often on the scalp. Apply a small amount to lengths, leave it on briefly, then shampoo thoroughly to prevent a lingering film. If hair feels coated after washing, reduce quantity and shorten contact time. Decision rule: select olive oil for thick, dry lengths and keep scalp use limited.
3.8 Avocado Oil
Avocado oil is nutrient-rich and heavier than many carriers, making it suitable for hair that feels rough, brittle, or prone to snapping. It works best when applied to lengths for softness and reduced friction rather than as a daily scalp base. Use a thin layer on damp hair, then focus scalp blends on lighter carriers for easier rinse-out. If your scalp reacts to richer oils, avoid overnight use. Decision rule: pick avocado oil for intensive length conditioning, not frequent root application.
3.9 Sunflower Oil
Sunflower oil is a generally light-to-medium carrier that can work well for people who want a simple, accessible base. It supports spreadability for essential oils and can be a practical option when you want to avoid heavy residue. Choose a fresh, well-stored product and watch for any rancid odor, since oxidation can worsen scalp sensitivity. Apply in small amounts and reassess after two wash cycles to confirm it rinses cleanly in your routine. Decision rule: choose sunflower oil when you want a neutral, easy-rinse base for consistent dilution.
Decision rule: Match carrier oil weight to scalp type and wash frequency, then keep your blend stable for two weeks before changing more than one variable.
4 How to Use Oils for Hair Growth Safely and Effectively
4.1 Dilution Ratios for Scalp Application
Dilution determines whether essential oils support the scalp or trigger irritation, so measure drops rather than guessing. A practical range for most adults is 0.5% to 2% essential oil in a carrier, with sensitive scalps staying closer to 0.5%–1%. Use lower dilution for “hot” oils and for first-time use, then increase only if the scalp stays calm across multiple applications. Keep blends simple because stacking multiple essential oils raises the total concentration and reaction risk.
Key rule: Never apply essential oils undiluted to the scalp, hairline, or behind the ears.
Use this quick conversion to stay consistent across batches and avoid accidental over-dosing. For 10 mL carrier oil, 0.5% is about 1 drop, 1% is about 2 drops, and 2% is about 4 drops, with drop size varying by bottle and viscosity. For 30 mL carrier oil, 1% is about 6 drops and 2% is about 12 drops, but stop lower if your scalp is reactive. If exactness matters, measure essential oils by weight using a small scale to avoid bottle-to-bottle drop variation.
4.2 Patch Testing and Sensitivity Management
A patch test reduces the chance of a full-scalp reaction that can disrupt your routine for weeks. Apply a small amount of your diluted blend to the inner forearm or behind the ear, then wait for delayed irritation over the next day. If burning, swelling, or a spreading rash occurs, discontinue and avoid that essential oil rather than trying to “push through.” Evidence is limited on predicting all reactions, so treat your own skin response as the deciding data.
Manage sensitivity by controlling variables and avoiding triggers that amplify irritation. Do not patch test right after shaving, exfoliating, or using strong acids on nearby skin, because the barrier is more reactive. Avoid applying oils to a scalp with open scratches, active infection, or sunburn, since irritation becomes more likely and harder to interpret. If shedding increases after a reaction, treat it as a stop signal and return to a basic cleanse-and-condition routine until the scalp stabilizes.

4.3 Application Methods for Scalp and Lengths
Apply oils to the scalp for scalp-focused goals and to the lengths for breakage control, because these targets behave differently. For scalp use, part hair into sections and place small amounts directly onto the scalp surface instead of coating the hair. For lengths, use a lighter application focused on mid-lengths and ends to reduce friction, then shampoo well if the oil film remains. Keep oils away from eyes, eyelids, and the mucous membranes around the nose to prevent irritation.
Use this step list to apply consistently without overloading the roots.
- Measure dilution in a small bottle and shake gently before each use.
- Part hair into 4–8 sections and apply a thin line to the scalp in each section.
- Massage lightly for 60–120 seconds using fingertip pads, not nails.
- Leave on for 30–180 minutes based on tolerance and residue level.
- Shampoo thoroughly, then reassess scalp comfort the next day before repeating.
4.4 Massage Techniques to Support Scalp Circulation
Scalp massage supports routine adherence because it improves distribution and reduces the urge to scratch. Use slow, small circles with gentle pressure, moving across the scalp rather than staying in one spot. Avoid aggressive rubbing because friction can inflame the scalp and increase breakage around the hairline. If your scalp is tender, reduce pressure and shorten massage time instead of stopping completely.
A reliable method is to work from the nape upward and around the temples without pushing hair tangles into tighter knots. Keep nails short or use the flat pads of fingers to avoid micro-scratches that can sting with oils later. If you wear protective styles, massage the scalp between parts rather than forcing fingers under tight sections. Decision rule: if massage causes soreness or redness, cut pressure by half and keep movements slow.
4.5 Recommended Frequency and Timing
Frequency should match your wash schedule and scalp type, because leaving oils on too long can cause buildup and itch. A workable starting point is 2 times per week for most scalps, increasing only if rinsing remains easy and scalp comfort improves. Apply oils on days when you can cleanse properly, since incomplete removal often causes dullness and flaking that gets mistaken for “detox.” If you sweat heavily or use styling products, reduce oil frequency to prevent residue layers.
Timing depends on tolerance and hair texture rather than a fixed “best” window. Many people do well with 30–90 minutes before washing, while heavier carriers may need shorter contact time to avoid greasy roots. Overnight application can work for some, but it also raises the chance of pillow transfer, clogged hairline pores, and scalp irritation. Decision rule: if roots look heavier or itch increases, shorten contact time before changing oils.
4.6 Storage, Shelf Life, and Oxidation Prevention
Storage affects safety because oxidized oils smell sharp and can irritate the scalp. Keep essential oils in dark glass, tightly capped, away from heat and sunlight, and store carrier oils in cool conditions to slow rancidity. Label blends with the mix date and use smaller batches so the oil stays fresh through your routine. Discard oils that smell sour, paint-like, or unusually pungent, since that change often signals oxidation.
Use practical verification cues before each application. Check for cloudiness, separation that does not remix, or a noticeable scent shift, especially in lighter carrier oils. Avoid dipping fingers into bottles, which introduces water and microbes, and use droppers or pump tops instead. Decision rule: if smell or texture changes, replace the oil rather than applying it to a sensitive scalp.
Stop signals and guidance: Persistent burning, swelling, oozing, or sudden patchy hair loss require stopping oils and seeking professional medical guidance to rule out dermatitis, infection, or inflammatory scalp conditions.
Decision rule: Keep dilution conservative, apply in sections, and adjust frequency based on scalp comfort and rinse-out performance before moving to blends and routines.
5 Best Essential Oil Blends for Hair Growth
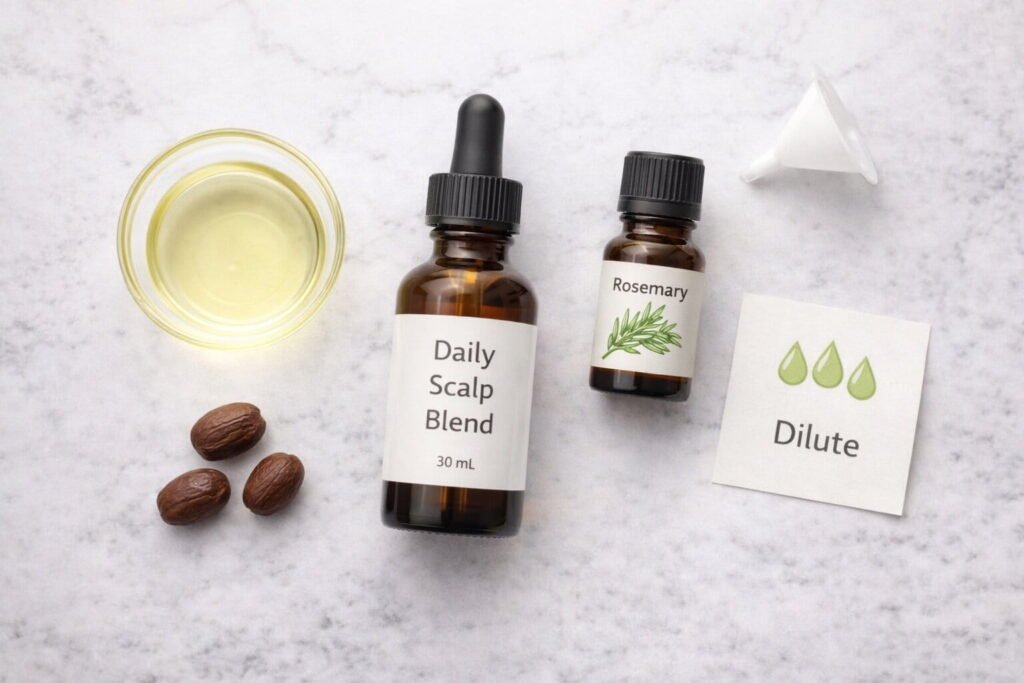
5.1 Daily Scalp Support Blend
A daily-use blend needs low dilution and a light carrier to avoid buildup that cancels out consistency. Use jojoba or grapeseed as the base, then select one gentle essential oil such as lavender or rosemary at a conservative level. Apply only to the scalp in thin sections and keep contact time short if you wash less often. If your scalp feels heavy or itchy, reduce frequency rather than increasing shampoo strength.
Use this measured approach to keep the blend repeatable. For a 30 mL bottle, keep the total essential oils near a low range and avoid mixing more than two actives. Start with one oil for two weeks so you can confirm it supports comfort and does not increase flakes. Decision rule: if the routine is hard to rinse out, the blend is too heavy for daily use.
5.2 Oily Scalp and Buildup Control Blend
For oily scalps, the blend should feel light and rinse clean to avoid a cycle of over-oiling and harsh washing. Choose grapeseed oil or jojoba oil as the carrier and use a single essential oil commonly used for scalp freshness such as cedarwood or lemongrass, keeping dilution modest. Apply primarily to the crown and areas that become greasy first, not the entire scalp by default. Pair this blend with thorough cleansing at the next wash, because residue can mimic dandruff.
A simple placement strategy improves results without increasing product. Focus on short contact times, such as 30–60 minutes, then shampoo using the pads of the fingers rather than nails. Avoid adding heavy oils to lengths on the same day if roots get oily fast, because the combined film can cause dullness. Decision rule: if oiliness rebounds faster, reduce total oil volume and shorten contact time.
5.3 Dry Scalp and Flaking Support Blend
Dry scalp routines should prioritize comfort and barrier support so flaking does not worsen from irritation. Choose a gentle carrier such as sweet almond oil or sunflower oil, then add a calming essential oil like lavender or a low-dose ylang-ylang if fragrance tolerance is good. Apply in small sections and avoid aggressive massage, since friction can create more scaling. Evidence is mixed for essential oils and flaking, so treat them as supportive rather than a guaranteed fix.
Improve outcomes by adjusting the wash routine alongside oils. Use lukewarm water, avoid repeated shampooing in one session, and rinse thoroughly so residue does not dry on the scalp. If flakes become thicker, yellow, or itchy, stop oils and reassess, because buildup and irritation can imitate dandruff patterns. Decision rule: if comfort improves but flakes persist, keep dilution low and focus on cleansing consistency.

5.4 Breakage and Split-End Support Blend
Breakage support blends should target lengths, because essential oils do not repair split ends once they form. Use a carrier oil that improves slip, such as argan for lighter hair or avocado for thicker, drier hair, and keep essential oils minimal or skip them if your scalp is sensitive. Apply to damp mid-lengths and ends, then detangle gently starting at the tips to reduce snapping. The visible benefit here is improved manageability and reduced friction, not faster follicle output.
Make this blend work by keeping it lightweight and pairing it with protective handling. Avoid saturating hair, since heavy oil can attract dust and increase washing friction later. Use heat tools less often and add a heat protectant if you style, because heat damage overwhelms any benefit from oils. Decision rule: if ends feel softer but still fray, trim damage and keep oiling focused on prevention.
5.5 Stress-Related Shedding Support Blend
Stress-related shedding often involves timing and biology, so oils mainly help by improving scalp comfort and making routines sustainable. Choose one calming essential oil such as lavender or clary sage with a light carrier, then keep the routine gentle and consistent for several weeks. Evidence is limited for oils changing stress-driven shedding patterns directly, so track shedding trends rather than expecting rapid change. Avoid frequent switching of products, because irritation can add another trigger.
A restrained routine improves adherence during stressful periods. Use brief massage, avoid tight hairstyles, and keep washing regular enough to prevent itch that leads to scratching. If shedding is sudden, severe, or paired with scalp pain, treat it as a stop signal and seek professional guidance to check for iron deficiency, thyroid issues, or inflammatory scalp disease. Decision rule: if shedding remains high for multiple weeks with no scalp improvement, prioritize medical evaluation over adding stronger oils.
Decision rule: Pick a blend that matches your scalp type and keep the formula stable for two weeks, because consistent dilution and rinse-out matter more than adding more ingredients.
6 Hair and Scalp Concerns and the Right Oils for Hair
6.1 Thinning Hair and Reduced Density
Thinning and reduced density can come from genetics, hormones, nutrition, inflammation, or styling damage, so oils function as supportive care rather than a primary treatment. Use oils for hair growth to reduce scalp irritation and improve handling, which can help you keep more hair through better length retention. Favor low-irritation essential oils like lavender or rosemary at conservative dilution and pair with a light carrier such as jojoba. Avoid frequent product changes because irritation and inconsistent care can make density concerns feel worse. Decision rule: if thinning is progressive or patchy, prioritize evaluation and keep oil use gentle and consistent.
6.2 Excess Shedding
Excess shedding may reflect seasonal shifts, recent illness, stress, medication changes, or scalp inflammation, so do not treat oil strength as the lever to pull. Oils can help if shedding is worsened by itch, scratching, or poor scalp tolerance to cleansing products. Use a low-dilution scalp blend and keep contact times moderate so you do not create buildup that increases shedding perception. Evidence is mixed, so track trends weekly instead of reacting to daily hair counts. Decision rule: if shedding spikes suddenly or continues beyond several weeks, stop experimenting and seek professional guidance.
6.3 Dandruff and Scalp Irritation
Dandruff-like symptoms can be driven by yeast imbalance, irritation, or buildup, and oils can help or worsen it depending on technique. Tea tree oil is commonly used for flake-prone scalps, but keep dilution low because overdosing often causes dryness and more flaking. Pair any oil routine with consistent cleansing that removes residue, since trapped oil films can feed scaling and itch. If your scalp becomes red, sore, or oozing, stop oils and treat it as a clear stop signal. Decision rule: if flakes worsen after oiling, shorten contact time and reduce total oil volume before changing ingredients.
6.4 Itchy Scalp and Inflammation
Itch can come from dryness, contact dermatitis, tight hairstyles, or product sensitivity, so treat oils as part of a calm-first approach. Use a gentle carrier and a mild essential oil such as lavender, and avoid “stimulating” oils if your scalp already feels inflamed. Keep massage light and stop if itch increases during or after application, because that pattern often points to irritation. Evidence is limited on oils resolving inflammatory scalp conditions, so do not delay professional assessment when symptoms persist. Decision rule: if itch returns quickly after every application, remove essential oils and reassess with carrier-only testing.
6.5 Oily Scalp and Product Buildup
Oiliness often reflects sebum production and wash frequency rather than a need for more oil. Use lighter carriers like grapeseed or jojoba and keep essential oils minimal to avoid coating the scalp. Apply only to targeted areas and focus on thorough shampooing, especially around the crown and hairline. Avoid layering oils over dry shampoo or heavy styling products, because residue stacks and increases itch. Decision rule: if hair looks greasy faster after oiling, cut the amount by half and shorten contact time.
6.6 Dry Hair, Frizz, and Moisture Loss
Dryness and frizz relate strongly to cuticle wear, heat damage, and mechanical friction, so carrier oils on lengths often matter more than essential oils. Use argan, avocado, or sweet almond oil sparingly on damp mid-lengths and ends to improve slip and reduce tangling. Essential oils are optional here and can be skipped if your scalp is reactive, since frizz control does not require scalp actives. Separate perception from outcomes: shine improves appearance, while reduced snapping improves length retention. Decision rule: if frizz improves but ends still snap, reduce heat and increase gentle detangling before adding more oil.

6.7 Heat and Chemical Damage
Heat styling and chemical processing weaken the hair shaft, so the most effective role for oils is reducing friction and improving manageability during styling. Apply a light carrier oil to ends after washing and use a dedicated heat protectant when using hot tools, because oils alone do not prevent thermal damage reliably. Keep essential oils off damaged, sensitized scalp areas, especially after bleaching or strong chemical treatments, because barrier disruption increases irritation risk. Focus on trimming split ends, gentler styling, and consistent conditioning as the core damage-control steps. Decision rule: if hair feels rough after oiling, reduce oil and prioritize conditioning and lower heat exposure.
7 Ingredient Quality and Buying Checklist
7.1 Label Terms to Understand and Verify
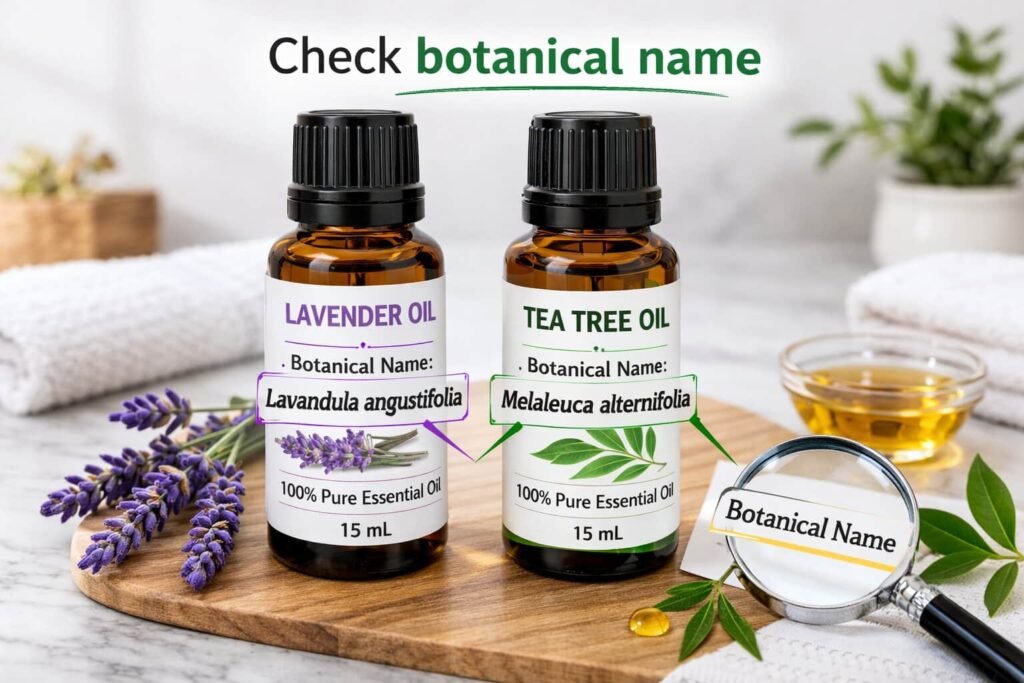
A quality purchase starts with labels that tell you exactly what you are buying, not vague marketing language. For essential oils, look for the botanical name and, when available, the plant part used, because different parts can vary in irritation potential. For carrier oils, confirm the ingredient list shows a single oil with no added fragrance, dyes, or unnecessary blends. Avoid products that do not state contents clearly, because unclear labeling increases the risk of sensitizers and inconsistent dilution.
Prioritize practical label cues that support consistent use. A carrier oil should have a neutral-to-mild natural scent, while essential oils should not smell “perfumey” in a way that suggests added fragrance. If the label lists “fragrance” without specifying the essential oil, treat it as unsuitable for a scalp routine. Decision rule: if the label cannot confirm what the bottle contains, do not apply it to the scalp.
7.2 Botanical Names and Chemotypes
Botanical names help you avoid mix-ups between similarly named oils that may behave differently on skin. This matters because irritation risk and scent profiles can vary even when common names look the same. Some essential oils also list a chemotype, which indicates a dominant chemical profile that can affect how strong the oil feels. When the chemotype is provided, treat it as a useful consistency cue, especially if you are sensitive or trying to replicate a blend that worked well.
Use botanical naming as your compatibility filter when repurchasing. Match the botanical name first, then compare other details like origin and extraction method if they are provided. Avoid switching between different variants while testing scalp tolerance, because it becomes hard to interpret reactions. Decision rule: buy the same botanical name consistently until you have a stable routine.
7.3 Purity, Adulteration Risks, and Testing
Purity matters because adulterated oils can contain irritants that cause redness, itching, and breakouts along the hairline. Look for brands that provide batch information and basic quality documentation, since transparency reduces the chance of mystery additives. Do not rely on scent intensity as a purity test, because strong fragrance can come from additives as easily as from genuine oil. If certainty is not possible, treat the safest route as minimal ingredients and conservative dilution.
Adulteration risk increases when price is unusually low or when labels avoid specifics. Choose products that list the botanical name and do not use generic terms like “aroma oil” for scalp application. If you experience repeated irritation across multiple essential oils, switch to a carrier-only routine and rebuild tolerance slowly. Decision rule: when reactions are frequent, simplify ingredients before changing dilution or frequency.
7.4 Packaging Standards for Stability
Packaging directly affects oxidation, which can turn oils into irritants over time. Essential oils should come in dark glass with a tight cap or reducer insert that limits air exposure. Carrier oils should also be stored in containers that reduce light and heat exposure, especially if you keep them in a bathroom. Avoid droppers that touch skin or hair, because contamination shortens shelf life and can worsen scalp issues.
Use storage practices that keep blends usable across the full routine window. Keep bottles away from windowsills, radiators, and steamy shower edges where temperature swings are common. Label blend bottles with the mix date so you can replace them before scent or texture changes occur. Decision rule: if storage conditions are hot or humid, make smaller batches and replace more often.
7.5 Sourcing Considerations for US and UK Markets
In US and UK markets, reputable sourcing often shows up as clear labeling, consistent packaging, and accessible customer support rather than vague quality claims. Favor sellers that provide product details like botanical name, volume, and basic usage guidance without pushing undiluted application. Check for return policies and lot/batch identification, because that supports accountability if a product causes irritation. Avoid sellers that re-bottle oils without clear traceability, since stability and purity become harder to assess.
Buy based on routine fit, not maximal variety. Select one carrier oil that matches your scalp type and one essential oil that you can tolerate, then expand only after two weeks of stable use. If you need hypo-scent routines, choose mild-scent carriers and skip strongly fragranced essential oils to improve adherence. Decision rule: choose suppliers that provide traceable details and repeatable quality cues, then keep your purchase list short.
Checklist: Buying and Verification for Oils for Hair
- Botanical name clearly printed for essential oils
- Single-ingredient carrier oil with no added fragrance
- Dark glass packaging for essential oils, tight seal for carriers
- Batch/lot info or traceability cue on label or packaging
- Fresh scent with no sour, paint-like, or sharp rancid notes
- Clear usage guidance that supports dilution and scalp safety
8 Hair Growth Routine Using Oils for Hair
8.1 Weekly Routine for Straight Hair
Straight hair often shows oil quickly at the roots, so keep scalp blends light and limit length application to the ends. Use a jojoba or grapeseed base with a low-dilution essential oil such as rosemary or lavender, then apply 30–60 minutes before washing. After washing, use only a few drops of a lighter carrier like argan on ends to reduce friction without flattening the roots. Avoid over-brushing when oil is present, because it spreads sebum and can make hair look greasy sooner. Decision rule: if roots lose volume the next day, reduce oil volume before changing the oil type.
8.2 Weekly Routine for Wavy Hair
Wavy hair needs slip for definition without heavy residue that drags the pattern down. Apply a diluted scalp blend 1–2 times weekly, then use a small amount of carrier oil on mid-lengths to reduce tangles before styling. Choose sweet almond or argan for lengths, and keep scalp carriers lighter to prevent buildup near the crown. Refresh between washes with water-based methods rather than adding more oil, because extra layers reduce bounce. Decision rule: if waves look limp, keep oil limited to ends and shorten scalp contact time.

8.3 Weekly Routine for Curly Hair
Curly hair benefits from oils mainly through reduced friction and improved detangling, which protects length retention. Use a diluted scalp blend once or twice weekly, then apply a medium-weight carrier such as avocado or sweet almond to mid-lengths and ends on damp hair. Detangle with a wide-tooth comb starting from ends and working upward to reduce snapping. Avoid heavy scalp saturation, since residue can trap lint and increase itch between wash days. Decision rule: if curls clump well but the scalp feels itchy, reduce scalp oil and keep length oiling minimal.
8.4 Weekly Routine for Coily Hair
Coily hair often needs more slip and protection to reduce breakage, but scalp comfort still depends on rinse-out performance. Use a diluted essential oil blend on the scalp in sections, then apply avocado, olive, or a controlled mix of castor plus a lighter oil to lengths for manageability. Keep traction low by avoiding tight styles immediately after oiling, since tension plus residue can irritate follicles. Focus on consistent cleansing and conditioning, because buildup can increase flakes even when hair feels moisturized. Decision rule: if ends stay soft but the scalp flakes, shorten contact time and increase rinse thoroughness.
8.5 Routine Adjustments by Porosity and Scalp Type
Porosity affects how hair holds oil on the surface, while scalp type determines how quickly residue becomes uncomfortable. Low-porosity hair often needs lighter oils and smaller amounts to avoid a coated feel, while higher-porosity hair may tolerate slightly richer oils on the lengths. Oily scalps typically do best with lightweight carriers and shorter contact time, while dry scalps often need gentler oils and a calmer cleansing routine. Keep adjustments small, changing only one variable at a time so your results remain interpretable. Decision rule: if hair looks greasy but feels dry, reduce scalp oil and shift oiling to damp ends only.
Key rule: Keep scalp oiling and length oiling separate, because scalp comfort and strand softness respond to different amounts and carriers.
If starting today guidance (simple weekly plan)
- Pick one carrier oil for scalp and one carrier oil for ends.
- Choose one essential oil and set a conservative dilution.
- Apply to scalp twice weekly for 30–90 minutes before washing.
- Oil ends lightly on damp hair after washing to reduce breakage.
- Track comfort and shedding weekly, then adjust only one variable.
9 Common Mistakes With Oils for Hair Growth
9.1 Using Undiluted Essential Oils
Applying essential oils directly to the scalp is a common cause of burning, redness, and delayed irritation. Even if the scalp feels fine initially, sensitization can develop later and disrupt your routine. Always mix essential oils into a carrier oil and keep the dilution conservative, especially near the hairline and temples. If contact occurs undiluted, rinse promptly with a gentle cleanser rather than adding more oil. Decision rule: if you cannot state your dilution, do not apply the blend.
9.2 Overuse Leading to Irritation or Greasiness
More oil does not equal more growth support, and overuse often creates buildup that increases itch and shedding perception. Heavy application can also weigh down hair, making density look worse even when hair is healthy. Use small amounts applied in sections, then adjust frequency based on how well your scalp rinses clean. If hair looks greasy quickly, reduce contact time before changing products. Decision rule: if the scalp feels coated after washing, cut the amount by half.
9.3 Mixing Incompatible Products
Combining oils with heavy styling products can trap residue and trigger irritation, especially if dry shampoo or waxes remain on the scalp. Some leave-in formulas also contain fragrance and sensitizers that stack with essential oils and increase reaction risk. Keep oil routines simple on the same day and avoid layering multiple fragranced products. If you must style, wash out oils fully before applying long-wear styling products. Decision rule: if itch increases after adding a new product, revert to the last stable routine.
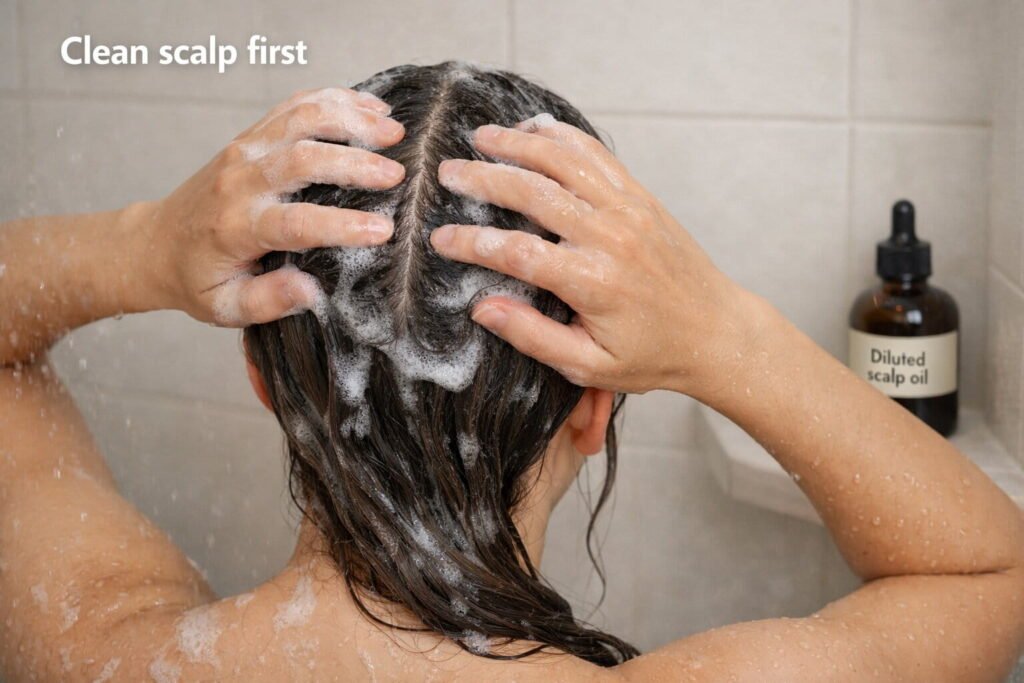
9.4 Skipping Cleansing and Scalp Hygiene
Oil routines work only when the scalp stays clean enough to tolerate regular application. Skipping shampoo or washing inadequately leaves residue that can dull hair and worsen flaking. Use a consistent cleansing schedule that matches your scalp type and activity level, and massage shampoo into the scalp gently to lift oil films. Rinse thoroughly and avoid leaving conditioner on the scalp unless it is designed for that use. Decision rule: if flakes increase after oiling, improve rinse-out before changing oils.
9.5 Expecting Results Without Consistency
Inconsistent use makes it hard to know whether oils are helping, irritating, or doing nothing. Hair changes slowly, and most visible improvements come from repeated low-irritation routines that reduce breakage and scratching. Evidence is mixed for direct growth effects, so treat progress as improved comfort, fewer tangles, and steadier shedding trends over time. Track one or two simple markers weekly rather than changing your approach after every wash. Decision rule: if you changed oils or dilution in the last two weeks, keep everything stable before judging results.
Decision rule: Prevent irritation and buildup first, because a calm scalp and repeatable routine do more for outcomes than stronger blends.
10 Results Timeline and Progress Tracking
10.1 What Changes to Expect by Week
Early changes usually show up as scalp comfort and easier detangling rather than visible new growth. In the first one to two weeks, many people notice less itching or tighter control over oiliness if the dilution and rinse-out are correct. By weeks three to six, improvements often relate to reduced breakage and better manageability, which can make hair appear fuller because fewer strands snap. Evidence is limited for rapid follicle changes from oils alone, so focus on repeatable signals like tolerance and shedding trends.
Expect setbacks when routines conflict with your wash schedule or styling habits. If you increase oil use without improving cleansing, buildup can mimic dandruff and make shedding look worse. If you switch oils frequently, you may mistake irritation cycles for “not working,” which leads to more changes and less clarity. Decision rule: judge progress only after two stable weeks with the same dilution, carrier, and frequency.
10.2 Measuring Shedding, Density, and Scalp Comfort
Tracking works best when you measure the same way each week. Use a simple shed count on wash day and one mid-week check, then note scalp comfort markers such as itch level, flake severity, and oiliness. Separate density perception from measurable trends by using consistent lighting and the same hair part for photos. Avoid daily checking because normal variability can trigger unnecessary changes.
Use this step list to keep tracking practical and comparable.
- Record wash-day shedding in a single note after detangling.
- Take one photo of the same part line weekly in the same light.
- Rate scalp comfort from 0–10 for itch and tightness.
- Note any triggers such as illness, stress, or new products.
- Review the pattern every two weeks before adjusting anything.
10.3 When to Adjust the Routine or Stop Use
Adjust only when you can link the change to a clear pattern rather than a single bad day. Reduce dilution, shorten contact time, or switch to a lighter carrier if you see persistent itch, redness, or heavier roots after washing. Stop use immediately if you experience burning that does not fade, swelling, hives, oozing, or sudden patchy hair loss, because these signals require prompt professional assessment. If shedding remains high for multiple weeks, treat oils as supportive and prioritize evaluating underlying causes.
Use a simple decision checklist to avoid overcorrecting.
- Adjust when: mild greasiness, mild dryness, or manageable flakes appear after oiling
- Pause and simplify when: repeated itching after each use or increasing irritation over a week
- Stop and seek professional help when: swelling, widespread rash, scalp pain, or patchy loss occurs
- Switch carriers when: rinse-out remains difficult despite smaller amounts
- Hold steady when: comfort improves and shedding trend stabilizes across two weeks
Mini case study (field patterns)
A common pattern appears when someone uses a thick carrier on an oily scalp and leaves it overnight, then shampoos lightly. The scalp often becomes itchier and flakes appear, which gets mistaken for “detox” rather than buildup irritation. Switching to a lighter carrier, shortening contact time to 45 minutes, and improving rinse-out typically restores comfort and makes the routine sustainable. That stability often reduces scratching and breakage, which supports better length retention over time.
Conclusion
The most reliable use of oils for hair growth starts with measured dilution, a carrier oil that rinses clean, and a routine you can repeat without irritation. Track comfort and shedding weekly, because stable patterns matter more than frequent changes. Keep essential oils minimal, protect hair lengths from friction, and treat strong reactions as stop signals. Next step: build a two-week baseline using one carrier and one essential oil, then refine only one variable at a time.